一、python脚本
1、情况1:正常return
文件名test1.py
#-*- coding:utf-8 -*-
#无参数有返回值的函数
def Have_return():
    return 'test1'
if __name__ == '__main__':
    Have_return()
2、情况2:使用sys.exit()方法,抛出异常的方式
文件名test2.py
#-*- coding:utf-8 -*-
#无参数有返回值的函数
#使用sys.exit()方法,抛出异常的方式
import sys
def Have_return():
    return 'test2'
    #或者
    #sys.exit('test2')
if __name__ == '__main__':
    #Have_return()
    #或者
    res = Have_return()
    sys.exit(res)
3、情况3:使用print打印
文件名test3.py
#-*- coding:utf-8 -*-
#无参数有返回值的函数
def Have_return():
    return 'test3'
    #或者
    #print("test3")
if __name__ == '__main__':
    #Have_return()
    #或者
    res = Have_return()
    print res
执行python脚本查看结果

二、shell脚本调用python脚本(python2.7.5版本)
1、方式1,python 文件名调用
文件名test1.sh 其中 ` 非 '(单引号)
#! /bin/bash
path=`pwd`
file_path=$path/test1.py
res=`python $file_path`
echo $res
执行shell脚本分别调用test1.py、test2.py、test3.py结果如下:
[root@localhost testpython]# sh test1.sh

[root@localhost testpython]# sh test1.sh
test2
[root@localhost testpython]# sh test1.sh
test3

[root@localhost testpython]#
2、方式2,使用python -c 命令调用
文件名test2.sh
#! /bin/bash
#python脚本所在目录path
path=`pwd`
#file_path=$path/test1.py
cd $path
res=`python -c "import test1; test1.Have_return()"`
echo $res
执行shell脚本分别调用test1.py、test2.py、test3.py都返回空与网上查找测试情况不一致,亦可能python版本不同导致
后添加print 后正常打印:res=`python -c "import test1;print test1.Have_return()"`
文件名test3.sh
#! /bin/bash
#python脚本所在目录path
path=`pwd`
#file_path=$path/test1.py
cd $path
res=`python -c "import test1;print test1.Have_return()"`
echo $res
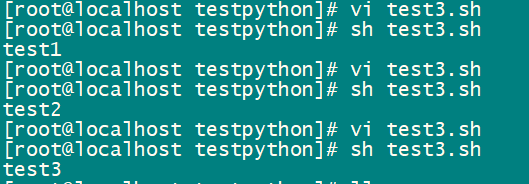
执行shell脚本test3.sh分别调用test1.py、test2.py、test3.py都可成功打印
三、shell传参给python脚本
1、方式1,python 文件名调用python脚本
1.1、python脚本
文件名test4.py
#-*- coding:utf-8 -*-
import argparse
parser = argparse.ArgumentParser() ## 新建参数解释器对象
parser.add_argument('--count',type=int) ## 添加参数,注明参数类型
parser.add_argument('--name') ## 添加参数
args = parser.parse_args()### 参数赋值,也可以通过终端赋值
def Introduce(count, name):
        print(count,name)
if __name__ == '__main__':
Introduce(args.count,args.name) ## 带参数直接执行python脚本python test4.py --count=9 --name=test4 ,结果如下

1.2、shell脚本
文件名test4.sh
#! /bin/bash
path=`pwd`
file_path=$path/test4.py
res=`python $file_path $@`
echo $res
1.3、调用命令
bash ./test4.sh --count=10 --name=test4
结果如下:

2、方式2,python -c 命令方式调用python脚本
2.1、python脚本
文件名test5.py
#-*- coding:utf-8 -*-
def Introduce(name):
    return name
    #或者
    #print(name)
if __name__ == '__main__':
    #Introduce("test5")
    #或者
    res = Introduce("test5")
print res直接执行python脚本python -c "import test5;print test5.Introduce('test5')" ,结果如下

2.1、shell脚本
文件名test5.sh
#! /bin/bash
#shell上送参数
#echo ${1}
#python脚本所在目录path
path=`pwd`
#file_path=$path/test5.py
cd $path
res=`python -c "import test5;print test5.Introduce('${1}')"`
echo $res
2.3、调用命令
bash ./test5.sh test5
结果如下:

四、shell调用python扩展学习
1、python脚本通sys.argv获取参数
1.1、python脚本
文件名test6.py
#-*- coding:utf-8 -*-
import sys
def Introduce(count, name):
     print(count,name)
if __name__ == '__main__':
     counts=sys.argv[1]
     names=sys.argv[2]
     Introduce(counts,names) ## 带参数
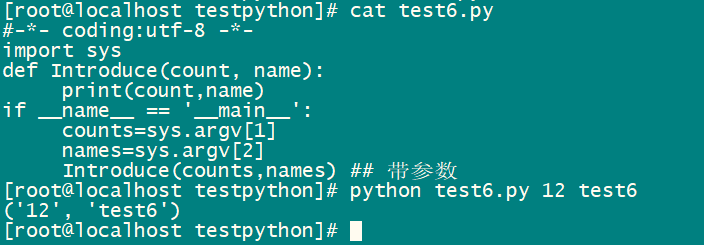
直接执行python脚本python test6.py 12 test6 ,结果如下
1.2、shell脚本
文件名test6.sh
#! /bin/bash
path=`pwd`
file_path=$path/test6.py
res=`python $file_path $@`
echo $res
1.3、调用命令
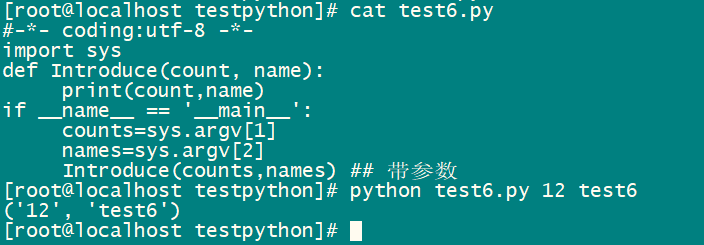
bash ./test6.sh 16 test6
结果如下:
2、shell脚本跨目录使用python 文件名 方式调用
2.1、python脚本
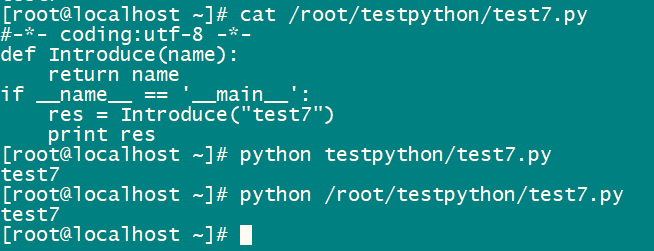
文件名test7.py
#-*- coding:utf-8 -*-
def Introduce(name):
    return name
if __name__ == '__main__':
    res = Introduce("test7")
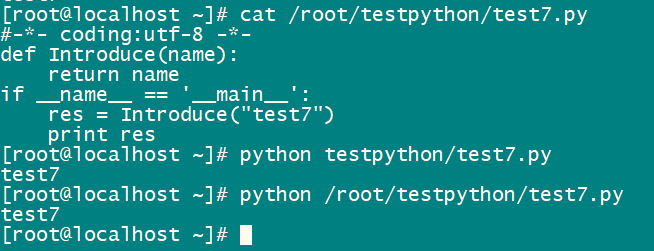
print res直接执行python脚本使用相对路径或者绝对路径
python testpython/test7.py #相对路径
python /root/testpython/test7.py #绝对路径
结果如下
2.2、shell脚本
文件名test7.sh
#! /bin/bash
file_path=testpython/test7.py
#file_path=/root/testpython/test7.py
res=`python $file_path`
echo $res
2.3、调用命令
bash ./test7.sh
结果如下:
3、shell脚本跨目录使用python -c 方式调用
3.1、python脚本
文件名test8.py
#-*- coding:utf-8 -*-
def Introduce(name):
    return name
if __name__ == '__main__':
    res = Introduce("test8")
    print res
2.2、shell脚本
当在test8.py同目录时可执行python -c "import test8;print test8.Introduce('test8')" 并成功输出
当与test8.py不同目录时会报错找不到对应的模块,显示如下:
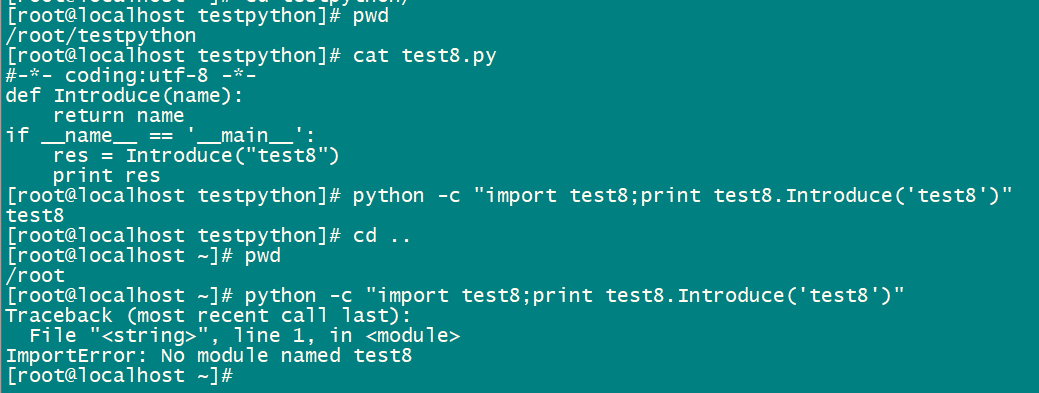
这是因为此脚本没有加到python环境中导致的。
可使用系统自带sys模块,然后将文件的路径进行追加,命令如下
python -c "import sys;sys.path.append('/root/testpython');import test8;print test8.Introduce('test8')"或者通过HOME路径追加
python -c "import sys;from os import getenv;sys.path.append(getenv('HOME')+'/testpython');import test8;print test8.Introduce('test8')"shell脚本文件名test8.sh
#! /bin/bash
res=`python -c "import sys;sys.path.append('/root/testpython');import test8;print test8.Introduce('test8')"`
#res=`python -c "import sys;from os import getenv;sys.path.append(getenv('HOME')+'/testpython');import test8;print test8.Introduce('test8')"`
echo $res
3.3、调用命令
bash ./test8.sh
结果如下:

以上其他各种输入输出调用方式可根据需要自由切换。
本文由一叶发布,不代表一叶立场,转载联系作者并注明出处:https://yiyeo.com/python/130.html
